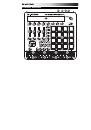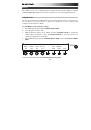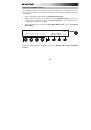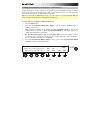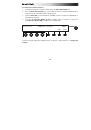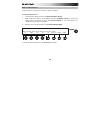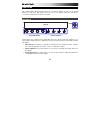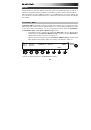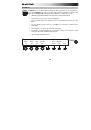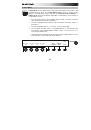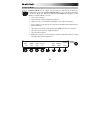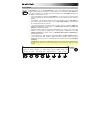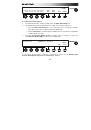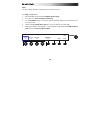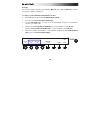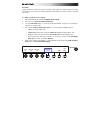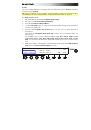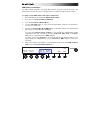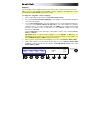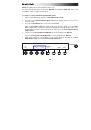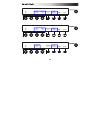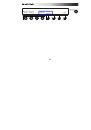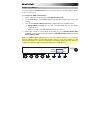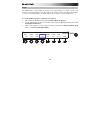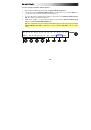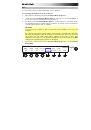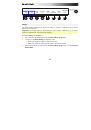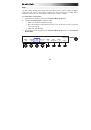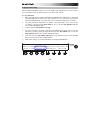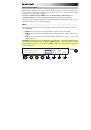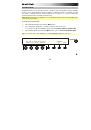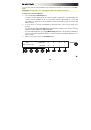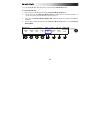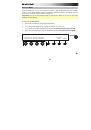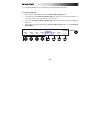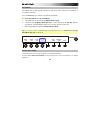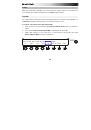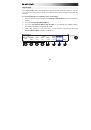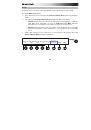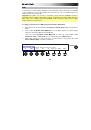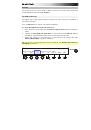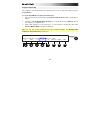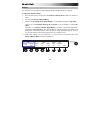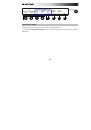
8
1.
Power Input:
If you do not want to use a computer in your setup (i.e., if you are using
Trigger Finger Pro to control an external MIDI module), connect this input to a power
outlet using an optional power adapter (6V DC, 1A, center-positive, sold separately). You
do not need this connection when using Trigger Finger Pro with a computer; it will be
powered by the USB bus.
2.
Power Switch:
Press this button to power Trigger Finger Pro on or off.
3.
USB Port:
Use a standard USB cable to connect this USB port to your computer. The
computer's USB port provides ample power to Trigger Finger Pro. This connection is also
used to send and receive MIDI data to and from your computer.
4.
MIDI Out:
Use a standard five-pin MIDI cable to connect this MIDI Out to the MIDI In of
an external MIDI device (e.g., a synthesizer, sequencer, drum machine, etc.).
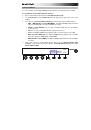
5.
Display:
Use this LCD to view Trigger Finger Pro's menus, options, parameters, and
settings.
6.
Value Dial
(
Push to Enter
)
:
Use this dial to change the Preset, parameter values, settings,
etc. Pressing the dial also functions as an
Enter
button.
7.
Function Buttons:
Press these buttons to execute the command shown right above it in
the display.
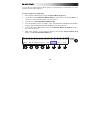
8.
Save:
Press this button to save the current Preset, Sequence, Preferences, or all three.
Tip:
Press and hold this button for two seconds to perform an automatic
Save All
. This
saves your Presets, Sequences, and Preferences all at once.
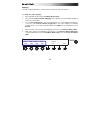
9.
Assignable Knobs:
Use these 360º knobs to send MIDI CC messages to your software
or external MIDI device. Alternatively, you can set the knobs to communicate with your
software using the Mackie Control or HUI protocols or to communicate with Arsenal. See
Working with Presets: Assignable Controls
for more information.
In Pad Mode and Sequence Mode, use these knobs to adjust the parameters shown right
above them in the display.