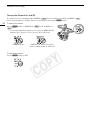
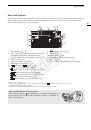
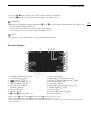
Assignable Buttons
112
NOTES
• You can check the two [Assign Button] status screens (
A
182) to see what functions are set for the
assignable buttons.
• You can reset only the functions assigned to the assignable buttons, without affecting other camera settings,
with the [
w
Other Functions]
>
[Reset]
>
[Assignable Buttons] function. All the assignable buttons will return
to their default function.
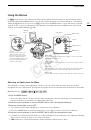
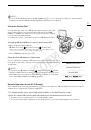
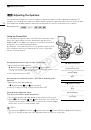
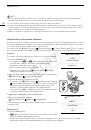
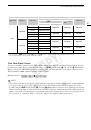
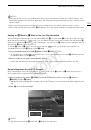
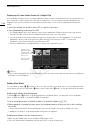
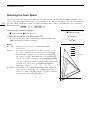
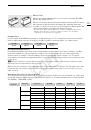
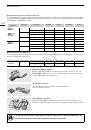
Using an Assignable Button
After you assign a function to one of the buttons, press the button to activate the function. For some functions,
an options menu may appear. In such case, select the desired option and then press SET.
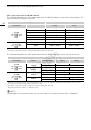
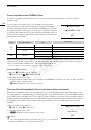
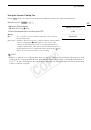
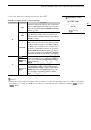
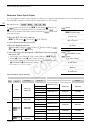
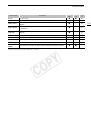
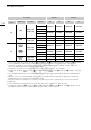
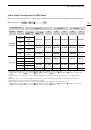
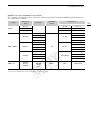
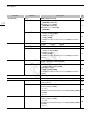
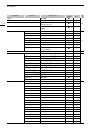
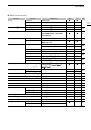
Assignable Functions
Functions can be set separately in
mode and
mode. Refer to the following table for assignable
functions and available modes.
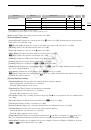
Function name
Description
A
[ND +]
Cycles through the ND filter settings in order (progressively darker).
Ü
–
[ND -]
Cycles through the ND filter settings in reverse order (progressively brighter).
Ü
–
[PEAKING]
Turns peaking on/off.
Ü
–
[ZEBRA]
Turns zebra patterns on/off.
Ü
–
[WFM]
Activates video scopes in the following sequence:
Waveform monitor
J
Vectorscope
J
Off
Ü
Ü
[EDGE MON.]
Turns the edge monitor on/off.
Ü
–
[MAGN.]
Turns magnification on/off.
Ü
–
[Color Bars]
Turns color bars on/off.
Ü
–
[Markers]
Turns onscreen markers on/off.
Ü
–
[LCD Setup]
Opens the [LCD Setup] submenu.
Ü
Ü
[VF Setup]
Opens the [VF Setup] submenu.
Ü
Ü
[LCD/VF B&W]
Turns the B&W mode of the LCD and viewfinder on/off.
Ü
Ü
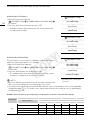
[View Assist.]
Turns view assistance on/off.
Ü
–
[LUT]
Turns the LUT from the MON. terminals and HD/SD SDI terminals on/off.
Ü
–
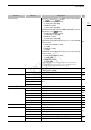
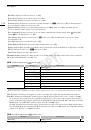
[Resize MON.
Output]
Switches the resizing method of the MON. 1 terminal output in the following sequence:
Letterbox
J
Squeeze
J
Side Crop
Ü
–
[Resize MXF
Output]
Switches the resizing method of MXF clips in the following sequence:
Letterbox
J
Squeeze
J
Side Crop
Ü
–
[Onscreen Display]
Turns on/off the inclusion of onscreen displays on video output from the HD/SD SDI
terminal, HDMI OUT terminal and SYNC OUT terminal (both HD and SD video output).
Ü
Ü
[Add Shot Mark 1]
Adds an
"
mark to the clip.
Ü
Ü
[Add Shot Mark 2]
Adds an
#
mark to the clip.
Ü
Ü
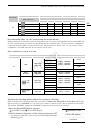
[Add
$
Mark]
Adds an
$
mark to the clip.
Ü
Ü
[Add
%
Mark]
Adds a
%
mark to the clip.
Ü
Ü
[Time Code]
Displays the [Time Code] submenu.
Ü
–
[Time Code Hold]*
Puts the time code display on hold or resumes it.
Ü
Ü
[Headphone +]
Increases the headphone volume.
Ü
Ü
[Headphone -]
Reduces the headphone volume.
Ü
Ü
[Audio Output CH]
Switches the audio channel for audio output from the
×
terminal.
Ü
Ü
[Audio Level]
Turns the audio level meter on/off.
Ü
Ü
COP
Y
 1
1
 2
2
 3
3
 4
4
 5
5
 6
6
 7
7
 8
8
 9
9
 10
10
 11
11
 12
12
 13
13
 14
14
 15
15
 16
16
 17
17
 18
18
 19
19
 20
20
 21
21
 22
22
 23
23
 24
24
 25
25
 26
26
 27
27
 28
28
 29
29
 30
30
 31
31
 32
32
 33
33
 34
34
 35
35
 36
36
 37
37
 38
38
 39
39
 40
40
 41
41
 42
42
 43
43
 44
44
 45
45
 46
46
 47
47
 48
48
 49
49
 50
50
 51
51
 52
52
 53
53
 54
54
 55
55
 56
56
 57
57
 58
58
 59
59
 60
60
 61
61
 62
62
 63
63
 64
64
 65
65
 66
66
 67
67
 68
68
 69
69
 70
70
 71
71
 72
72
 73
73
 74
74
 75
75
 76
76
 77
77
 78
78
 79
79
 80
80
 81
81
 82
82
 83
83
 84
84
 85
85
 86
86
 87
87
 88
88
 89
89
 90
90
 91
91
 92
92
 93
93
 94
94
 95
95
 96
96
 97
97
 98
98
 99
99
 100
100
 101
101
 102
102
 103
103
 104
104
 105
105
 106
106
 107
107
 108
108
 109
109
 110
110
 111
111
 112
112
 113
113
 114
114
 115
115
 116
116
 117
117
 118
118
 119
119
 120
120
 121
121
 122
122
 123
123
 124
124
 125
125
 126
126
 127
127
 128
128
 129
129
 130
130
 131
131
 132
132
 133
133
 134
134
 135
135
 136
136
 137
137
 138
138
 139
139
 140
140
 141
141
 142
142
 143
143
 144
144
 145
145
 146
146
 147
147
 148
148
 149
149
 150
150
 151
151
 152
152
 153
153
 154
154
 155
155
 156
156
 157
157
 158
158
 159
159
 160
160
 161
161
 162
162
 163
163
 164
164
 165
165
 166
166
 167
167
 168
168
 169
169
 170
170
 171
171
 172
172
 173
173
 174
174
 175
175
 176
176
 177
177
 178
178
 179
179
 180
180
 181
181
 182
182
 183
183
 184
184
 185
185
 186
186
 187
187
 188
188
 189
189
 190
190
 191
191
 192
192
 193
193
 194
194
 195
195
 196
196
 197
197
 198
198
 199
199
 200
200
 201
201
 202
202
 203
203
 204
204
 205
205
 206
206
 207
207
 208
208
 209
209
 210
210
 211
211
 212
212