189
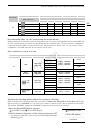
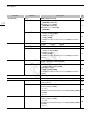
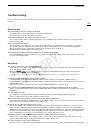
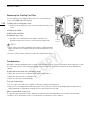
Troubleshooting
appears in red on the screen.
- The camera’s internal temperature has risen while
appeared in yellow on the screen.
- If [Other Functions]
>
[Fan] is set to [On], turn off the camera and wait until the temperature has lowered.
- In
mode, when [Other Functions]
>
[Fan] is set to [Automatic] and the cooling fan is deactivated while you are
shooting, the cooling fan will start automatically (
appears on the screen).
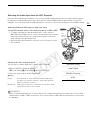
- The camera’s internal temperature will rise if the cooling fan filter under the MON./3G-SDI terminal cover has clogged.
Replace the filter (
A
198).
appears on the screen.
- The camera and lens cannot communicate normally.
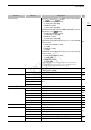
Picture and Sound
Screen displays turn on and off repeatedly.
- The battery pack is exhausted. Replace or charge the battery pack.
- Remove the battery pack and reattach it correctly.
Abnormal characters appear on the screen and the camera does not operate properly.
- Disconnect the power source and reconnect it after a short time. If the problem still persists, perform one of the
following actions.
• Disconnect the power source and press the RESET button. This resets all the camera’s settings to default values
except for custom picture settings and the hour meter.
• Use the [Other Functions]
>
[Reset]
>
[All Settings] function. This resets all the camera’s settings to default values
except for the hour meter.
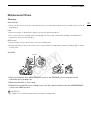
Video noise appears on screen.
- Keep a distance between the camera and devices that emit strong electromagnetic fields such as near powerful
magnets and motors, MRI machines or high-voltage power lines.
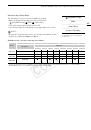
Horizontal bands appear on the screen.
- This is a phenomenon typical of CMOS image sensors when recording under some types of fluorescent, mercury or
sodium lamps. This is not a malfunction. You may be able to reduce the symptoms by setting the shutter mode to
[Speed] and the shutter speed to a value matching the frequency of the local electrical system: 1/50* or 1/100 for
50 Hz systems, 1/60 or 1/120 for 60 Hz systems.
* May not be available depending on the frame rate.
Audio cannot be recorded.
- An external microphone connected to the XLR terminal requires phantom power. Set the XLR terminal switch to
MIC+48V (
A
93).
- The camera’s MIC terminal is given priority over the XLR terminals. To record audio from the XLR terminals, be sure not
to connect any microphones to the MIC terminal.
Audio is recorded at an extremely low level.
- When using the XLR terminals: The AUDIO LEVEL switch is set to M, and the recording level is set too low. When using
the MIC terminal: [Audio Setup]
>
[Audio Input]
>
[MIC Mode] is set to [Manual] and the [MIC Level] setting is too
low. Check the audio level meter on the screen or rear panel and adjust the audio level correctly (
A
- The microphone attenuator is on. Turn off the microphone attenuator (
A
Sound is distorted or is recorded at lower levels.
- When recording near loud sounds (such as fireworks, shows or concerts), sound may become distorted or it may not
be recorded at the actual levels. Activate the microphone attenuator (
A
95, 96), or adjust the audio recording level
manually.
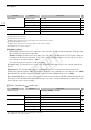
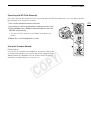
Recording Media and Accessories
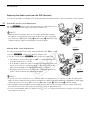
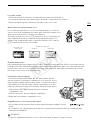
Cannot insert the recording media.
- The CF card or SD card you are trying to insert is not facing the correct direction. Turn it over and insert it.
Cannot record on the CF card.
- A compatible CF card must be used (
A
43).
- Initialize the CF card (
A
45) when you use it with the camera for the first time.
- The CF card is full or it already contains the maximum number of clips (999 clips). Delete some clips (
A
134) to free
some space or replace the CF card.
COP
Y
 1
1
 2
2
 3
3
 4
4
 5
5
 6
6
 7
7
 8
8
 9
9
 10
10
 11
11
 12
12
 13
13
 14
14
 15
15
 16
16
 17
17
 18
18
 19
19
 20
20
 21
21
 22
22
 23
23
 24
24
 25
25
 26
26
 27
27
 28
28
 29
29
 30
30
 31
31
 32
32
 33
33
 34
34
 35
35
 36
36
 37
37
 38
38
 39
39
 40
40
 41
41
 42
42
 43
43
 44
44
 45
45
 46
46
 47
47
 48
48
 49
49
 50
50
 51
51
 52
52
 53
53
 54
54
 55
55
 56
56
 57
57
 58
58
 59
59
 60
60
 61
61
 62
62
 63
63
 64
64
 65
65
 66
66
 67
67
 68
68
 69
69
 70
70
 71
71
 72
72
 73
73
 74
74
 75
75
 76
76
 77
77
 78
78
 79
79
 80
80
 81
81
 82
82
 83
83
 84
84
 85
85
 86
86
 87
87
 88
88
 89
89
 90
90
 91
91
 92
92
 93
93
 94
94
 95
95
 96
96
 97
97
 98
98
 99
99
 100
100
 101
101
 102
102
 103
103
 104
104
 105
105
 106
106
 107
107
 108
108
 109
109
 110
110
 111
111
 112
112
 113
113
 114
114
 115
115
 116
116
 117
117
 118
118
 119
119
 120
120
 121
121
 122
122
 123
123
 124
124
 125
125
 126
126
 127
127
 128
128
 129
129
 130
130
 131
131
 132
132
 133
133
 134
134
 135
135
 136
136
 137
137
 138
138
 139
139
 140
140
 141
141
 142
142
 143
143
 144
144
 145
145
 146
146
 147
147
 148
148
 149
149
 150
150
 151
151
 152
152
 153
153
 154
154
 155
155
 156
156
 157
157
 158
158
 159
159
 160
160
 161
161
 162
162
 163
163
 164
164
 165
165
 166
166
 167
167
 168
168
 169
169
 170
170
 171
171
 172
172
 173
173
 174
174
 175
175
 176
176
 177
177
 178
178
 179
179
 180
180
 181
181
 182
182
 183
183
 184
184
 185
185
 186
186
 187
187
 188
188
 189
189
 190
190
 191
191
 192
192
 193
193
 194
194
 195
195
 196
196
 197
197
 198
198
 199
199
 200
200
 201
201
 202
202
 203
203
 204
204
 205
205
 206
206
 207
207
 208
208
 209
209
 210
210
 211
211
 212
212