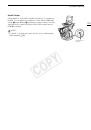
Recording Audio
92
Recording Audio
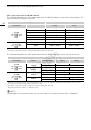
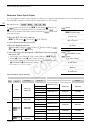
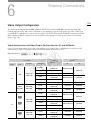
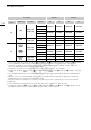
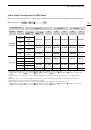
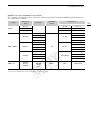
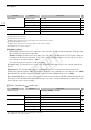
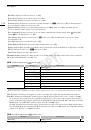
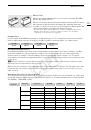
The camera features two-channel linear PCM audio recording and playback with a sampling frequency of
48 kHz. You can record audio using commercially available microphones (XLR terminal, MIC terminal) or line
input (XLR terminal). You can select the audio input independently for channel 1 and channel 2.
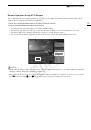
An audio signal will be output with the video signal from the 3G-SDI terminals, MON. terminals and HD/SD SDI
terminal. When you use an external recorder, the audio signal will also be recorded.
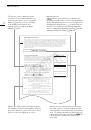
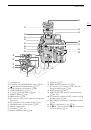
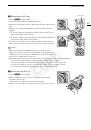
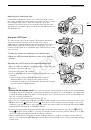
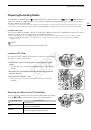
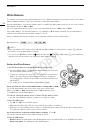
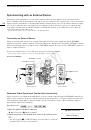
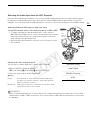
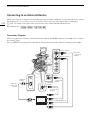
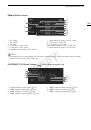
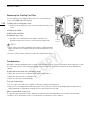
Connecting an External Microphone or External Audio Input Source to the Camera
In order to use the XLR terminals, the monitor unit must be attached to the camera. The monitor unit features
two XLR terminals (CH1/CH2) that can be used to record audio independently to the two audio channels.
In addition to XLR microphones, you can also connect to the camera’s MIC terminal commercially available
condenser microphones with their own power supply and a
∅
3.5 mm mini-stereo plug*. If the monitor unit is
attached to the camera, you can use the microphone holder on the monitor unit.
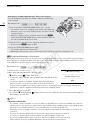
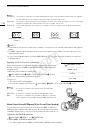
* For 50.00 Hz recordings, use commercially available microphones with a cable no longer than 3 m.
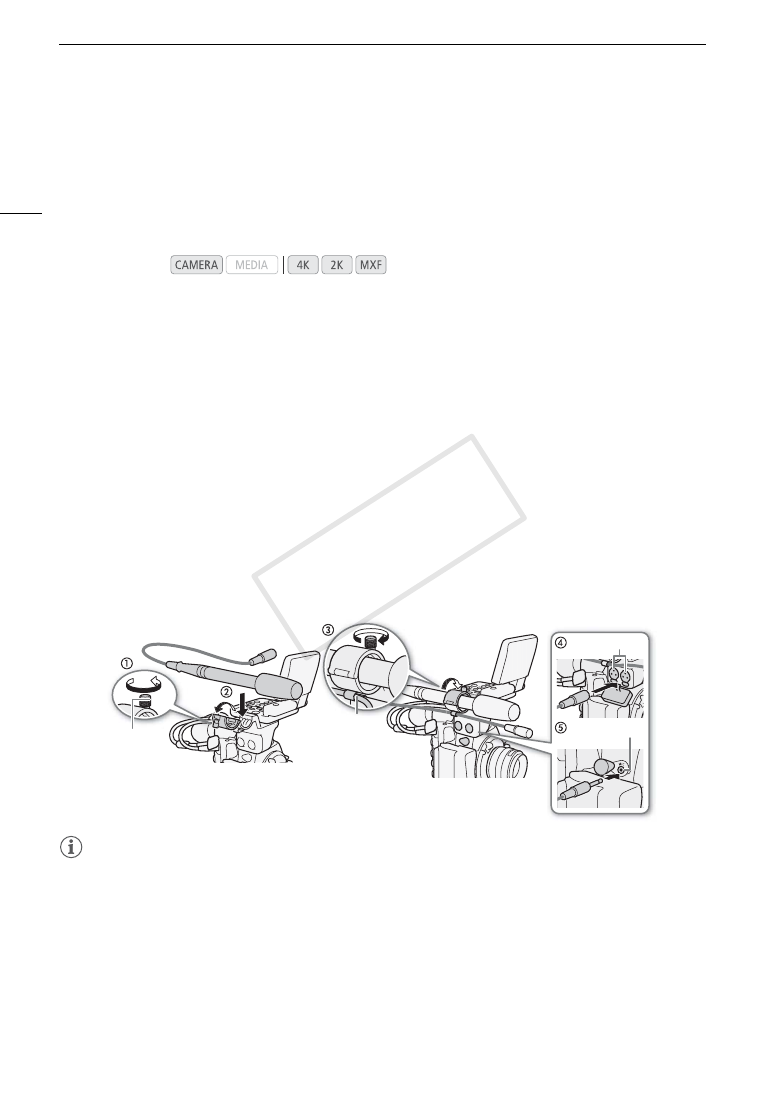
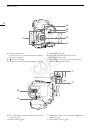
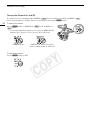
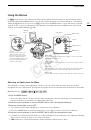
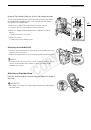
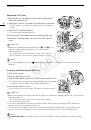
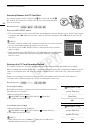
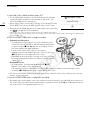
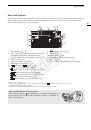
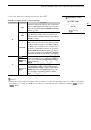
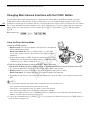
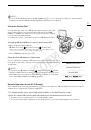
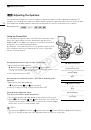
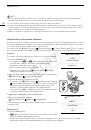
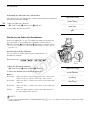
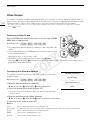
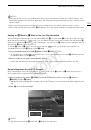
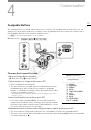
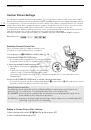
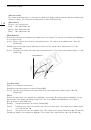
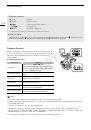
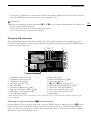
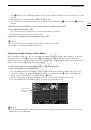
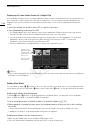
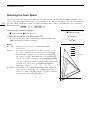
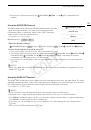
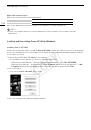
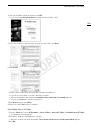
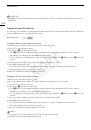
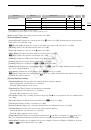
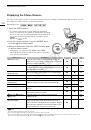
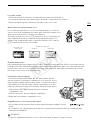
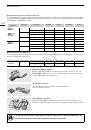
Follow the procedure below to attach a microphone (refer also to the following illustration). To connect an
external device to the camera, plug the device’s cable into the camera’s XLR terminal (
햵
).
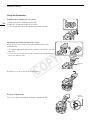
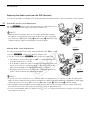
1 Loosen the microphone lock screw (
햲
), open the microphone holder and insert the microphone (
햳
).
2 Tighten the lock screw and put the microphone cable through the microphone cable clamp under
the microphone holder (
햴
).
3 Plug the microphone cable into the desired XLR terminal (
햵
) or the MIC terminal (
햶
).
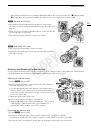
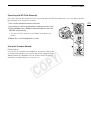
NOTES
• Be careful not to pass the microphone cable in front of the cooling fan’s air vents. Failure to do so may cause
audio noise to be recorded.
Operating modes:
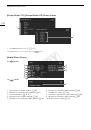
Microphone
lock screw
MIC terminal
Cable clamp
XLR terminals
COP
Y
 1
1
 2
2
 3
3
 4
4
 5
5
 6
6
 7
7
 8
8
 9
9
 10
10
 11
11
 12
12
 13
13
 14
14
 15
15
 16
16
 17
17
 18
18
 19
19
 20
20
 21
21
 22
22
 23
23
 24
24
 25
25
 26
26
 27
27
 28
28
 29
29
 30
30
 31
31
 32
32
 33
33
 34
34
 35
35
 36
36
 37
37
 38
38
 39
39
 40
40
 41
41
 42
42
 43
43
 44
44
 45
45
 46
46
 47
47
 48
48
 49
49
 50
50
 51
51
 52
52
 53
53
 54
54
 55
55
 56
56
 57
57
 58
58
 59
59
 60
60
 61
61
 62
62
 63
63
 64
64
 65
65
 66
66
 67
67
 68
68
 69
69
 70
70
 71
71
 72
72
 73
73
 74
74
 75
75
 76
76
 77
77
 78
78
 79
79
 80
80
 81
81
 82
82
 83
83
 84
84
 85
85
 86
86
 87
87
 88
88
 89
89
 90
90
 91
91
 92
92
 93
93
 94
94
 95
95
 96
96
 97
97
 98
98
 99
99
 100
100
 101
101
 102
102
 103
103
 104
104
 105
105
 106
106
 107
107
 108
108
 109
109
 110
110
 111
111
 112
112
 113
113
 114
114
 115
115
 116
116
 117
117
 118
118
 119
119
 120
120
 121
121
 122
122
 123
123
 124
124
 125
125
 126
126
 127
127
 128
128
 129
129
 130
130
 131
131
 132
132
 133
133
 134
134
 135
135
 136
136
 137
137
 138
138
 139
139
 140
140
 141
141
 142
142
 143
143
 144
144
 145
145
 146
146
 147
147
 148
148
 149
149
 150
150
 151
151
 152
152
 153
153
 154
154
 155
155
 156
156
 157
157
 158
158
 159
159
 160
160
 161
161
 162
162
 163
163
 164
164
 165
165
 166
166
 167
167
 168
168
 169
169
 170
170
 171
171
 172
172
 173
173
 174
174
 175
175
 176
176
 177
177
 178
178
 179
179
 180
180
 181
181
 182
182
 183
183
 184
184
 185
185
 186
186
 187
187
 188
188
 189
189
 190
190
 191
191
 192
192
 193
193
 194
194
 195
195
 196
196
 197
197
 198
198
 199
199
 200
200
 201
201
 202
202
 203
203
 204
204
 205
205
 206
206
 207
207
 208
208
 209
209
 210
210
 211
211
 212
212