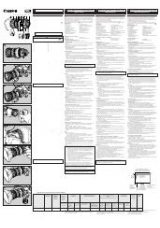
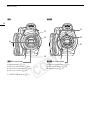
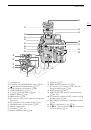
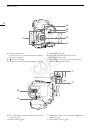
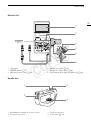
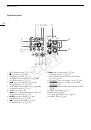
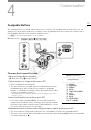
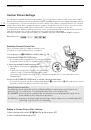
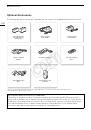
187
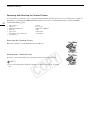
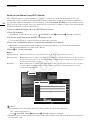
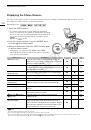
Troubleshooting
Troubleshooting
If you have a problem with your camera, refer to this section. Consult a Canon Service Center if the problem
persists.
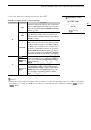
Power source
The camera will not turn on or it turns off by itself.
- The battery pack is exhausted. Replace or charge the battery pack.
- Remove the battery pack and reattach it correctly.
Shortly after turning it on, the camera turns off on its own.
- You are using a DC coupler or a battery pack that is not compatible for use with this camera. Use a recommended
battery pack (
A
201).
Cannot charge the battery pack.
- The temperature of the battery pack is outside the charging range. If the battery pack’s temperature is below 0 °C
(32 °F), warm it before charging it; if it is above 40 °C (104 °F), let the battery pack cool down before charging it.
- Charge the battery pack in temperatures between 0 °C and 40 °C (32 °F and 104 °F).
- The battery pack is faulty. Replace the battery pack.
The battery pack is exhausted extremely quickly even at normal temperatures.
- Check the [Battery/Hour Meter] status screen (
A
185) to see whether the battery pack is at the end of its service life.
If so, buy a new battery pack.
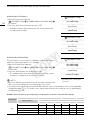
Recording
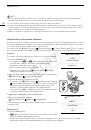
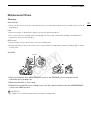
The camera’s controls are not responsive/disabled
- The plug being connected into the GRIP terminal may not be correctly connected. Make sure the plug is firmly inserted
all the way into the GRIP terminal.
- When the
Q
switch is set to
C
, all buttons except for the START/STOP button are locked* and cannot be
operated. Set the
Q
switch to CAMERA.
* If the [
w
Other Functions]
>
[Custom Function]
>
[
C
START/STOP] setting is on, the START/STOP button will also be
locked.
Pressing the START/STOP button will not start recording.
- Set [4K/2K/MXF Setup]
>
[3GI-SDI Output] to [On] to enable output from the 3G-SDI or MON. terminals.
- Set [4K/2K/MXF Setup]
>
[Rec Command] to [On] to enable the external recorder to be operated using the camera’s
START/STOP button.
- The camera is in lens exchange mode. Press the LENS EXCHANGE button to exit the mode.
The point where the START/STOP button was pressed does not match the beginning/end of the recording.
- There is a slight interval between pressing the START/STOP button and the actual start/end of recording. This is not a
malfunction.
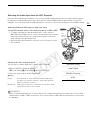
The camera will not focus.
- The viewfinder is not adjusted. Use the dioptric adjustment dial to make the proper adjustment (
A
36).
- The lens is dirty. Clean the lens with a soft lens-cleaning cloth.
When a subject flits across in front of the lens, the image appears slightly bent.
- This is a phenomenon typical of CMOS image sensors. When a subject crosses very quickly in front of the camera, the
image may seem slightly warped. This is not a malfunction.
Bright red, green or blue dots appear on the screen.
- The camera’s CMOS sensor is a delicate piece of precision engineering. Direct exposure of the sensor to ion rays or other
types of cosmic radiation may affect it and this may rarely appear as bright colored dots on the screen. This is the nature of
CMOS image sensors and does not represent a malfunction. Adjusting the black balance (
A
48) may help solve the problem.
- The effects of the damage may be more noticeable when the camera is used in places subject to high temperatures,
when a high ISO speed or gain level is used and when slow shutter speeds are used.
Changing between recording (
Ü
REC) and record pause (STBY) takes longer than usual.
- When the CF card contains a large number of clips, some operations may take longer than usual. Save your clips
(
A
153) and initialize the CF card (
A
45). Alternatively, replace the CF card.
The camera cannot record to a CF card properly.
- This may occur as recordings are made and deleted over time. Save your clips (
A
153) and initialize the CF card (
A
45).
COP
Y
 1
1
 2
2
 3
3
 4
4
 5
5
 6
6
 7
7
 8
8
 9
9
 10
10
 11
11
 12
12
 13
13
 14
14
 15
15
 16
16
 17
17
 18
18
 19
19
 20
20
 21
21
 22
22
 23
23
 24
24
 25
25
 26
26
 27
27
 28
28
 29
29
 30
30
 31
31
 32
32
 33
33
 34
34
 35
35
 36
36
 37
37
 38
38
 39
39
 40
40
 41
41
 42
42
 43
43
 44
44
 45
45
 46
46
 47
47
 48
48
 49
49
 50
50
 51
51
 52
52
 53
53
 54
54
 55
55
 56
56
 57
57
 58
58
 59
59
 60
60
 61
61
 62
62
 63
63
 64
64
 65
65
 66
66
 67
67
 68
68
 69
69
 70
70
 71
71
 72
72
 73
73
 74
74
 75
75
 76
76
 77
77
 78
78
 79
79
 80
80
 81
81
 82
82
 83
83
 84
84
 85
85
 86
86
 87
87
 88
88
 89
89
 90
90
 91
91
 92
92
 93
93
 94
94
 95
95
 96
96
 97
97
 98
98
 99
99
 100
100
 101
101
 102
102
 103
103
 104
104
 105
105
 106
106
 107
107
 108
108
 109
109
 110
110
 111
111
 112
112
 113
113
 114
114
 115
115
 116
116
 117
117
 118
118
 119
119
 120
120
 121
121
 122
122
 123
123
 124
124
 125
125
 126
126
 127
127
 128
128
 129
129
 130
130
 131
131
 132
132
 133
133
 134
134
 135
135
 136
136
 137
137
 138
138
 139
139
 140
140
 141
141
 142
142
 143
143
 144
144
 145
145
 146
146
 147
147
 148
148
 149
149
 150
150
 151
151
 152
152
 153
153
 154
154
 155
155
 156
156
 157
157
 158
158
 159
159
 160
160
 161
161
 162
162
 163
163
 164
164
 165
165
 166
166
 167
167
 168
168
 169
169
 170
170
 171
171
 172
172
 173
173
 174
174
 175
175
 176
176
 177
177
 178
178
 179
179
 180
180
 181
181
 182
182
 183
183
 184
184
 185
185
 186
186
 187
187
 188
188
 189
189
 190
190
 191
191
 192
192
 193
193
 194
194
 195
195
 196
196
 197
197
 198
198
 199
199
 200
200
 201
201
 202
202
 203
203
 204
204
 205
205
 206
206
 207
207
 208
208
 209
209
 210
210
 211
211
 212
212