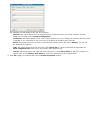
8.
Select
Uninstall
and click
Uninstall
.
9.
When the message which warns that all applications will close on your computer appears, Click
Continue
.
10.
When the uninstall is done, click
Quit
.
Linux
Install Linux Driver
1.
Make sure that the machine is connected to your network and powered on. Also, your machine’s IP address
should have been set.
2.
Insert the supplied software CD into your CD/DVD drive.
3.
Double-click CD-ROM icon that appears on your Linux desktop.
4.
Double-click the
Linux
folder.
5.
Double-click the
install.sh
icon.
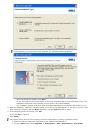
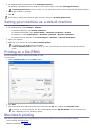
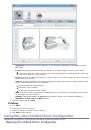
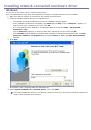
6.
The
Dell Installer
window opens. Click
Continue
.
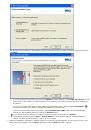
7.
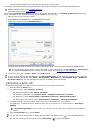
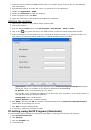
The Add printer wizard window opens. Click
Next
.
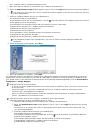
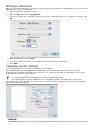
8.
Select Network printer and click
Search
button.
9.
The Printer’s IP address and model name appears on list field.
10.
Select your machine and click
Next
.
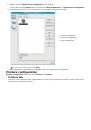
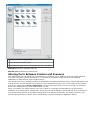
Add network Printer
1.
Double-click the
Unified Driver Configurator
.
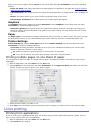
2.
Click
Add Printer…
3.
The
Add printer wizard
window opens. Click
Next
.
4.
Select
Network printer
and click the
Search
button.
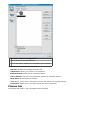
5.
The printer’s IP address and model name appears on list field.
6.
Select your machine and click
Next
.
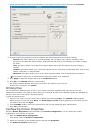
7.
Input the printer description and
Next
8.
When the add printer is done, click
Finish
.
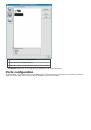
IPv6 Configuration
TCP/IPv6
is supported properly only in Windows Vista or higher.
If the IPv6 network seems to not be working, set all the network setting to the factory defaults and try again (See
Restoring factory default settings
To use the IPv6 network environment, follow the next procedure to use the IPv6 address:
1.
Connect your machine to the network with a network cable.
2.
Turn on the machine.
3.
Print a
Network Configuration Report
from the machine’s control panel that will check IPv6 addresses.
1.
Press
Menu
(
) on the control panel.
2.
Press the left/right arrow until
Network
appears and press
OK
.
3.
Press the left/right arrow until
Network Info.
appears and press
OK
.
4.
Press the left/right arrow until
Yes
appears and press
OK
.
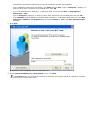
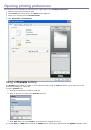
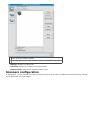
4.
Select
Start
>
Control Panel
>
Hardware and Sound
>
Printers
>
Add Printer
.
5.
Click
Add a local printer
on the
Add Printer
windows.
6.
Follow the instruction on the window.
If the machine does not work in the network environment, activate IPv6. Refer to the next section followed by.
Activating IPv6
The machine is provided with IPv6 feature on.
1.
Press
Menu
(
) on the control panel.
2.
Press the left/right arrow until
Network
appears and press
OK
.
3.
Press the left/right arrow until
TCP/IP (IPv6)
appears and press
OK
.
4.
Press the left/right arrow until
IPv6 Activate
appears and press
OK
.
Press the left/right arrow until
On
appears and press
OK
.
 1
1
 2
2
 3
3
 4
4
 5
5
 6
6
 7
7
 8
8
 9
9
 10
10
 11
11
 12
12
 13
13
 14
14
 15
15
 16
16
 17
17
 18
18
 19
19
 20
20
 21
21
 22
22
 23
23
 24
24
 25
25
 26
26
 27
27
 28
28
 29
29
 30
30
 31
31
 32
32
 33
33
 34
34
 35
35
 36
36
 37
37
 38
38
 39
39
 40
40
 41
41
 42
42
 43
43
 44
44
 45
45
 46
46
 47
47
 48
48
 49
49
 50
50
 51
51
 52
52
 53
53
 54
54
 55
55
 56
56
 57
57
 58
58
 59
59
 60
60
 61
61
 62
62
 63
63
 64
64
 65
65
 66
66
 67
67
 68
68
 69
69
 70
70
 71
71
 72
72
 73
73
 74
74
 75
75
 76
76
 77
77
 78
78
 79
79
 80
80
 81
81
 82
82
 83
83
 84
84
 85
85
 86
86
 87
87
 88
88
 89
89
 90
90
 91
91
 92
92
 93
93
 94
94
 95
95
 96
96
 97
97
 98
98
 99
99
 100
100
 101
101
 102
102
 103
103
 104
104
 105
105
 106
106
 107
107
 108
108
 109
109
 110
110
 111
111
 112
112
 113
113
 114
114
 115
115
 116
116
 117
117
 118
118
 119
119
 120
120
 121
121
 122
122
 123
123
 124
124
 125
125
 126
126
 127
127
 128
128
 129
129
 130
130
 131
131
 132
132
 133
133
 134
134
 135
135
 136
136
 137
137
 138
138