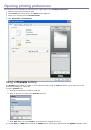
#
#
Correcting numbers or names
If you make a mistake while entering a number or name, press the left/right arrow button to delete the last digit or
character. Then enter the correct number or character.
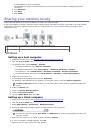
Inserting a pause
With some telephone systems, you must dial an access code (9, for example) and listen for a second dial tone. In
such cases, you must insert a pause in the telephone number. You can insert a pause while you are setting up speed
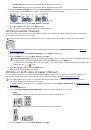
dial numbers.To insert a pause, press
Redial/Pause
at the appropriate place while entering the telephone number.
A - appears on the display at the corresponding location.
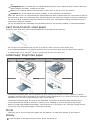
Using the save modes
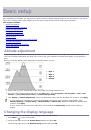
Using the toner saving feature
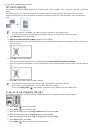
Toner save mode allows your machine to use less toner on each page. Activating this mode extends the life of the
toner cartridge beyond what one would experience in the normal mode, but it reduces print quality.
1.
Press
Menu
(
) on the control panel.
2.
Press the left/right arrow until
System Setup
appears and press
OK
.
3.
Press the left/right arrow until
Machine Setup
appears and press
OK
.
4.
Press the left/right arrow until
Toner Save
appears and press
OK
.
5.
Press the left/right arrow until
On
appears and press
OK
.
6.
Press
Stop/Clear
(
) to return to ready mode.
When PC-printing, you can also turn on or off toner save mode in the printer properties.
Using the power saving feature
When you are not using the machine for a while, use this feature to save power.
1.
Press
Menu
(
) on the control panel.
2.
Press the left/right arrow until
System Setup
appears and press
OK
.
3.
Press the left/right arrow until
Machine Setup
appears and press
OK
.
4.
Press the left/right arrow until
Power Save
appears and press
OK
.
5.
Press the left/right arrow to select the time you want.
6.
Press
OK
to save the selection.
7.
Press
Stop/Clear
(
) to return to ready mode.
Available settings range from 1-120 minutes. The factory default setting is 1 minute.
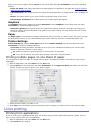
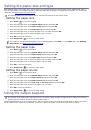
Setting the default tray and paper
You can select the tray and paper you would like to keep using for printing job.
In the control panel
Setting the paper size
1.
Press
Menu
(
) on the control panel.
2.
Press the left/right arrow until
System Setup
appears and press
OK
.
3.
Press the left/right arrow until
Paper Setup
appears and press
OK
.
4.
Press the left/right arrow until
Paper Size
appears and press
OK
.
5.
Press the left/right arrow to select the paper tray you want and press
OK
.
6.
Press the left/right arrow to select the paper size you want.
7.
Press
OK
to save the selection.
8.
Press
Stop/Clear
(
) to return to ready mode.
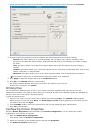
Setting the paper type
1.
Press
Menu
(
) on the control panel.
2.
Press the left/right arrow until
System Setup
appears and press
OK
.
 1
1
 2
2
 3
3
 4
4
 5
5
 6
6
 7
7
 8
8
 9
9
 10
10
 11
11
 12
12
 13
13
 14
14
 15
15
 16
16
 17
17
 18
18
 19
19
 20
20
 21
21
 22
22
 23
23
 24
24
 25
25
 26
26
 27
27
 28
28
 29
29
 30
30
 31
31
 32
32
 33
33
 34
34
 35
35
 36
36
 37
37
 38
38
 39
39
 40
40
 41
41
 42
42
 43
43
 44
44
 45
45
 46
46
 47
47
 48
48
 49
49
 50
50
 51
51
 52
52
 53
53
 54
54
 55
55
 56
56
 57
57
 58
58
 59
59
 60
60
 61
61
 62
62
 63
63
 64
64
 65
65
 66
66
 67
67
 68
68
 69
69
 70
70
 71
71
 72
72
 73
73
 74
74
 75
75
 76
76
 77
77
 78
78
 79
79
 80
80
 81
81
 82
82
 83
83
 84
84
 85
85
 86
86
 87
87
 88
88
 89
89
 90
90
 91
91
 92
92
 93
93
 94
94
 95
95
 96
96
 97
97
 98
98
 99
99
 100
100
 101
101
 102
102
 103
103
 104
104
 105
105
 106
106
 107
107
 108
108
 109
109
 110
110
 111
111
 112
112
 113
113
 114
114
 115
115
 116
116
 117
117
 118
118
 119
119
 120
120
 121
121
 122
122
 123
123
 124
124
 125
125
 126
126
 127
127
 128
128
 129
129
 130
130
 131
131
 132
132
 133
133
 134
134
 135
135
 136
136
 137
137
 138
138
Инструкции и руководства похожие на DELL 1135n