26
Dear Customers!
We urge that you read this user’s manual carefully. Special attention
needs to be paid to the safety precautions. Please save this manual so it
can be referred to in the future use of the product .
The manufacturer is not liable for any potential damage caused by
using the appliance for anything other than its intended use or by its
incorrect operation.
The manufacturer reserves the right to modify the product at any
time, without prior notice, in order to adjust it to the legal regulations,
standards, directives or for construction, commercial, aestehetic or
other reasons.
Contents
This appliance is not intended for use by persons (including children)
–
with reduced physical, sensory or mental capabilities, or lack of expe
-
rience and knowledge, unless they have been given supervision or in
-
struction concerning use of the appliance by a person responsible for
their safety.
Children should be supervised to ensure that they do not play with the
–
appliance.
Technical data
The technical parameters are given on the data plate of the product.
Power rating: 970–1150 W at 220–240 V.
Capacity of the water tank: 1000 ml.
Dimensions: 233 x 245 x 300 mm.
The espresso machine is equipped with an additional safety device.
If the appliance is not used for about 1 hr, the espresso machine will
automatically switch off.
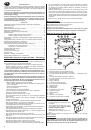
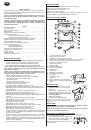
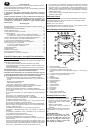
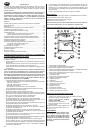
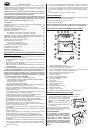
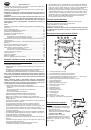
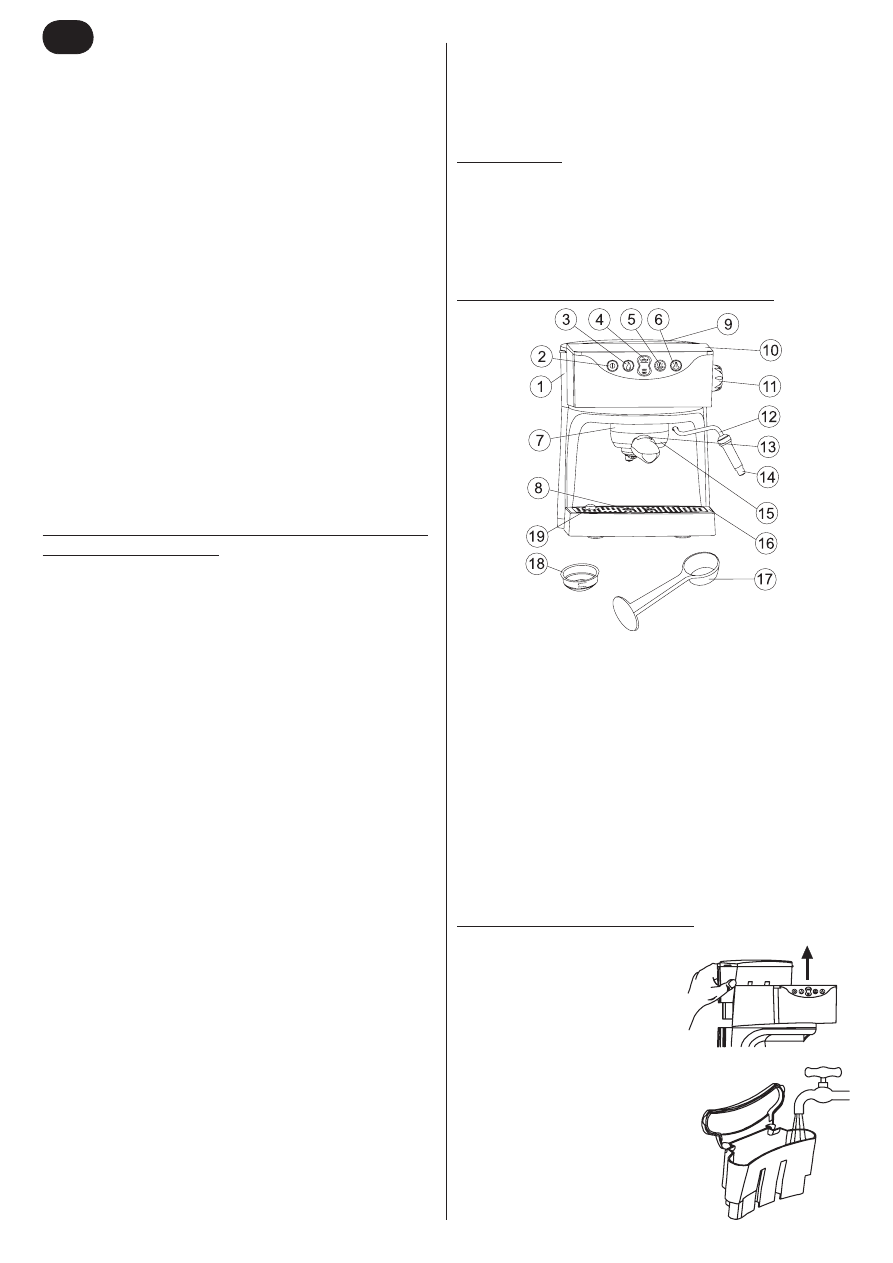
Structure of espresso machine type 13Z010
1. Removable water tank
2. Main switch with pilot light
3. Button for manual espresso coffee brewing
4. Button for setting espresso coffee brewing – 1 cup or 2 cups
5. Button for setting temperature of espresso
6. Steam activating button for cappuccino coffee
7. Brew head
8. Plate for cups
9. Lid of water tank
10. Cup warming plate
11. Steam regulator knob
12. Steam wand
13. Filter lock
14. Cappuccino attachment
15. Filter holder
16. Drip tray
17. Measuring spoon
18. Filter for 1 or 2 cups
19. „Empty the drip tray”
indicator
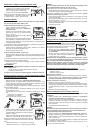
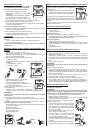
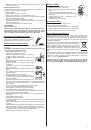
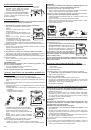
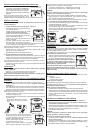
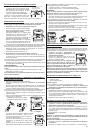
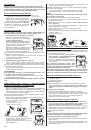
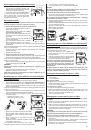
Filling the water tank with water
Disconnect the espresso machine from the power supply network.
–
Pull the water tank
–
(1)
upwards and
remove it.
Open the water tank lid
–
(9)
and fill it
with fresh cold water;
do not exceed
the MAX level
.
Close the lid of the water tank.
–
Replace the water tank and press it.
–
The water tank may be filled without
removing it from the appliance by e.g.
pouring water from a jug.
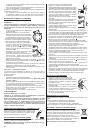
WARNING!
Do not use the espresso machine
when the water tank is empty. The
tank needs to be filled when the wa
-
ter level is below the MIN level. Do not
fill the tank with hot water. Do not lea
-
ve cold water in the tank for a longer
time for hygiene reasons.
Safety precautions and guidelines on the proper use of the espresso machine
2
6
Technical data .................................................................................................... 2
6
Structure of espresso machine type 13Z010 ................................................... 2
6
Filling the water tank with water ........................................................................ 2
6
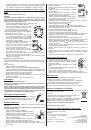
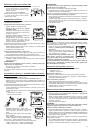
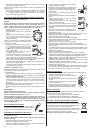
Removing and replacing the filter holder ......................................................... 2
6
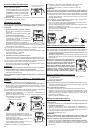
Rinsing the system ............................................................................................ 27
Rinsing the system for the espresso coffee function .................. 27
Rinsing the system for the cappuccino function ......................... 27
Brewing espresso coffee with the use of the automatic brewing function ...... 27
Preparing espresso coffee with the use of the manual brewing function ...... 27
Setting the temperature of espresso coffee ..................................................... 27
Changing the set amount of espresso coffee .................................................. 27
Preparing frothed milk for cappuccino coffee .................................................. 27
Steam function for cappuccino coffee. ........................................ 2
8
Filling the espresso machine with water – replenishing water .... 2
8
Emptying the drip tray ....................................................................................... 2
8
Descaling ........................................................................................................... 2
8
Cleaning and maintenance ............................................................................... 2
8
Standard requirements ..................................................................................... 2
8
Ecology – let’s look after the environment ....................................................... 2
8
Safety precautions and guidelines on the proper use
of the espresso machine
Always stick to the following basic safety precautions when using the
electrical appliance:
Espresso machine type 13Z010 is intended for household use only.
–
Plug the espresso machine into a 230 V alternating current electric soc
-
–
ket equipped with a safety pin only.
Before using the espresso machine, unfold and straighten the con
-
–
necting cord.
If the non-detachable part of the cord is damaged, it should be re
-
placed by the producer or at a proper service point or by a qualified
person in order to avoid any hazards.
Only qualified staff may make repairs to the appliance. A wrongly
done repair may pose a serious threat to the user. In case any defects
occur, take the appliance to a ZELMER specialist service point.
Always disconnect the appliance from the power supply network:
–
before removing any parts from the appliance and before replacing
•
them,
before cleaning or maintenance,
•
after using the appliance,
•
if the appliance does not function properly.
•
Extreme caution is necessary when using the espresso machine.
–
Keep the espresso machine out of the reach of children.
–
Empty the water tank after each use.
–
Before preparing coffee, check that the filter holder is properly fixed.
–
Do not operate the espresso machine if the connecting cord or any
–
other part is damaged.
Be careful not to wet the plug of the connecting cord.
–
Do not use the appliance if it does not operate properly.
–
Do not remove the plug from the mains socket by pulling the connecting
–
cord and do not place the cord on sharp edges.
Do not let children touch the appliance or the connecting cord when the
–
espresso machine operates.
Do not use extension cords which do not have suitable equipment cer
-
–
tificates.
Do not touch the hot parts of the appliance, e.g. the cup warming plate,
–
the filter, the steam wand etc.
Do not remove the filter holder when the espresso machine operates.
–
Do not place or use the espresso machine on a wet or hot surface.
–
Do not use the appliance when the drip tray or the grid for cups have
–
not been properly placed in their place.
Do not turn on the espresso machine if there is no water in the water
–
tank.
Do not immerse the appliance in water or any other liquid.
–
Do not open the body of the appliance and do not remove any parts
–
from the espresso machine.
Do not use any abrasive cleaning agents such as emulsions, creams,
–
pastes, etc for cleaning the body of the appliance. They might remo
-
ve graphic information symbols such as: scales, marks, warning signs,
etc.
GB